
Aunque aquí donde vivo el clima no ha sido el mejor, ni es muy marcado, el verano es la temporada de ahorita y definitivamente en estas fechas se sienten los días más calientes. En el post de hoy les quiero enseñar esos "beauty must haves" que en mi opinión no pueden faltar para cuando vamos a la playa, o simplemente para días muy calientes y como lograr un maquillaje ligero que nos haga vernos mejor.
Here where I live, the weather has not been the best, because we don't have very strong seasons, but summer is right now and definitely at this time we're feeling the hottest days. In today's post I wanted to show you those spring & summer beauty must haves, in my opinion you can't leave them when going to the beach, or simply on super hot days, and how to achieve a light makeup that makes us look better.
BB Cream

El primer must have es BB cream. Cuando el clima está muy caliente y sabemos que vamos a pasar un día muy ocupado o llevando sol, no es buena idea usar base, y si lo vas a hacer entonces que sea muy ligera. Yo prefiero usar bb cream te emparejan el tono de piel, te cubren un poco, humectan y aparte te protegen del sol. Definitivamente no podes salir sin esto, yo uso esta de "Garnier" tiene spf 15, cubre bastante y casi no se siente, o pueden usar esta de "Maybelline", no cubre mucho pero tiene spf 30 y eso es un gran plus.
The first must have is BB cream. When the weather is very hot and we know we are going to spend a really busy day in the sun is not a good idea to use foundation, and if you do, then use one that has a light coverege. I prefer to use bb cream, they can even up your skin tone, cover those imperfections, moisturize your skin and protect you from the sun. Definitely you gotta have it, I use this one from Garnier, it has spf 15, covers a lot and is barely felt, or you can use this one from Maybelline does not cover much but has spf 30 and that's a big plus.

Waterproof Mascara

Muchas personas dicen que odian las mascaras a prueba de agua porque se les hace muy difícil quitarla pero yo no pienso lo mismo. Yo uso waterproof mascara todos los días y no me tengo que preocupar por comparar una diferente para el verano, las mascaras regulares están hechas a base de agua por lo tanto cuando la aplico las pestañas en lugar de rizarse se hacen mas lacias y se caen, a diferencia de las mascaras a prueba de agua que están hechas a base de aceite, para removerla solo utilizo aceite en un algodón y en un minuto ya no tengo nada. Para el verano las recomiendo muchísimo definitivamente tenés que usar mascara a prueba de agua si querés que las pestañas te duren el mayor tiempo posible. No todas funcionan igual, la mascara que es buenísima para una no precisiamente va a ser lo mismo en otras personas. Dos que me han funcionado muy bien son Colossal Volume Express Mascara de "Maybelline" y Telescopic Shocking Extensions Mascara de "L'oreal".
Many people say that they hate waterproof mascaras because they find them very difficult to remove but I don't think so. I use waterproof mascara every day so I don't have to worry about getting a new one for summer. Regular mascaras are made from water so when I apply them my lashes go straight instead of become curly. With waterproof mascaras it's different they are made from oil, to remove the product I only use oil on a cotton pad and in a minute I have nothing. For spring and summer I highly recommend them if you want that your lashes lasts as long as possible. Not all mascaras work the same for everyone but here's two that have worked very well on me Colossal Volume Express Mascara from"Maybelline" and Telescopic Shocking Extensions Mascara from"L'oreal".
Lipstick como Rubor
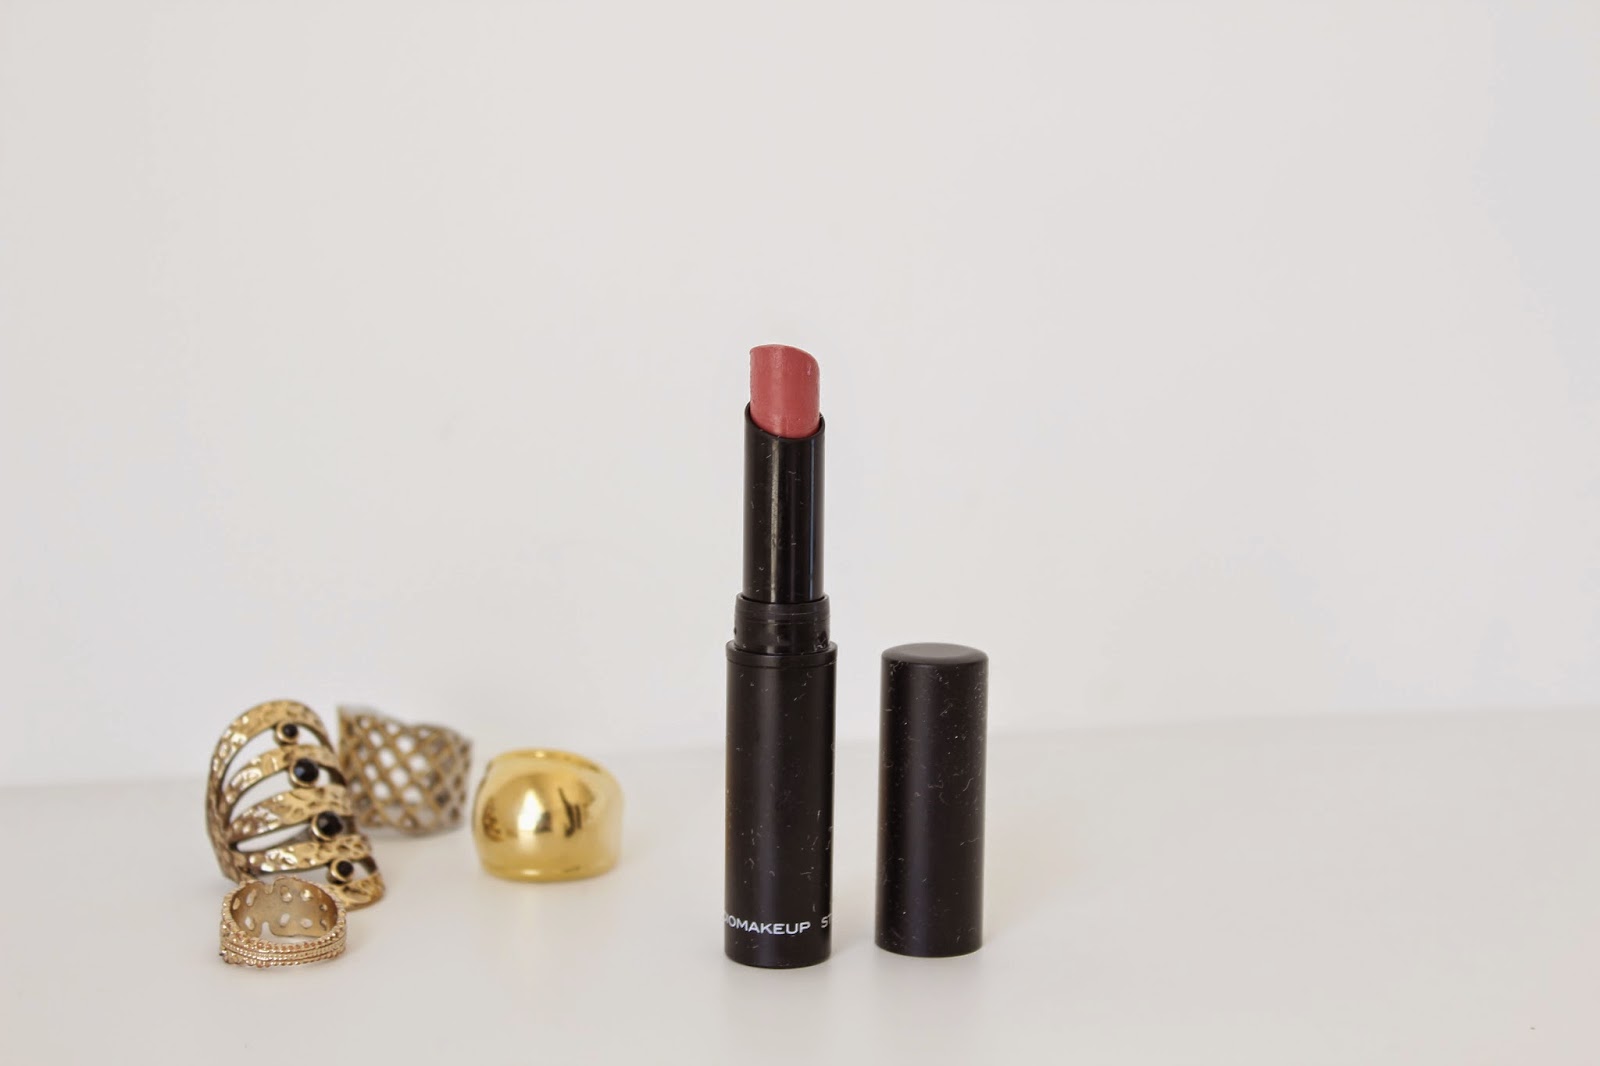
Me gusta muchísimo el rubor pienso que le da vida a la cara, en el verano no puede faltar. Me gusta usar uno que sea cremoso, por el momento no tengo uno pero lo que me gusta hacer y que funciona prácticamente igual es usar un lipstick. Este es de Studiomakeup lo compre porque me encanta el color pero la verdad no soy muy fan del acabado que tiene entonces lo aprovecho como rubor, solo lo aplico en mis mejillas, difumino con los dedos y listo!
I really like blush, I think that it gives me a healthy look. For summer they are an essencial. I like to use one that is creamy but I don't have any at the moment so what I like to do, and it works almost the same, is to use a lipstick. This one is from Studiomakeup, I got it because I love the color but I'm not a fan of the finish that it has, instead I used it as a blush, I apply it only on my cheeks, blend it with my fingers and you are ready to go!
Lip Balm

Otro escencial son los bálsamos de labios, con el clima caliente tienden a deshifratarse y a quebrarse, y todas sabemos que no se ve nada bonito. A mi me encantan los Baby Lips, definitivamente son un must have si querés labios suaves.
Another essential are lip balms. In the hot weather they tend to get dehydrated, and we all know that it doesn't look cute at all. That's why I love Baby Lips, definitely are a must have if you want soft lips.
White Nail Polish

Los esmaltes de uñas para esta temporada son los colores brillantes, en mi caso no me encantan los colores muy encendidos, entonces me gusta usar las uñas de blanco, es igual de llamativo para estos días y se ve hermoso con la piel broceada aparte de que este color está muy muy de moda y yo me uno a la tendencia porque se ve bastante bien. Este de la foto es uno de esos baratísimos que se consiguen en cualquier parte pero podés conseguir uno donde sea y de mejor calidad para que te dure más.
For spring & summer bright nail polishes are always trendy, in my case I don't love very bright colors, so I like to use white nail polish, it's as flashy as the other colors but still neutral. For these days it looks beautiful with tanned skin besides this color is very very fashionable and I joined the trend because it looks pretty good. The one in this picture is a really cheap one, the kind of nail polish you can get anywhere but you can get a better quality nail polish to make it last longer
Hair Mousse

Y por último, les recomiendo usar un mousse para el pelo cuando no tienen mucho tiempo para arreglárselo. Yo me lavo el cabello lo aplico como tratando de hacer ondas esto le da volumen y un estilo relajado y bohemio, la verdad me encanta como se ve aparte me dura todo el día y no me tengo que preocupar por si esta enredado o no, siempre se ve bien, Con esto conseguís cabello con volumen y textura sin tener que usar un rizador aparte de que no durás 5 min. Este que uso es de Suave
And finally, I recommend using a hair mousse when you don't have plenty of time to do your hair. I wash my hair, then I apply it trying to make waves, this provides volume and a relaxed, bohemian kind of style, I really love how it looks it lasts on me all day and I don't have to worry about tangled hair, always looks good, with this you can get voluminous hair with texture without using a curling iron and it takes less than five minutes. This one is from Suave
Espero que les haya gustado el post de hoy y que les sea bastante útil, además espero que disfruten muchísimo estos días de sol y nunca esta demás aceptar la ayuda de esos productos que nos hacen ver un poquito mejor.
I hope you liked today's post and hope this was helpful. Also I hope you enjoy these sunny days and remember it never hurts to take help from those products that make us look a little bit better.
I really like blush, I think that it gives me a healthy look. For summer they are an essencial. I like to use one that is creamy but I don't have any at the moment so what I like to do, and it works almost the same, is to use a lipstick. This one is from Studiomakeup, I got it because I love the color but I'm not a fan of the finish that it has, instead I used it as a blush, I apply it only on my cheeks, blend it with my fingers and you are ready to go!
Lip Balm
Otro escencial son los bálsamos de labios, con el clima caliente tienden a deshifratarse y a quebrarse, y todas sabemos que no se ve nada bonito. A mi me encantan los Baby Lips, definitivamente son un must have si querés labios suaves.
Another essential are lip balms. In the hot weather they tend to get dehydrated, and we all know that it doesn't look cute at all. That's why I love Baby Lips, definitely are a must have if you want soft lips.
White Nail Polish
Los esmaltes de uñas para esta temporada son los colores brillantes, en mi caso no me encantan los colores muy encendidos, entonces me gusta usar las uñas de blanco, es igual de llamativo para estos días y se ve hermoso con la piel broceada aparte de que este color está muy muy de moda y yo me uno a la tendencia porque se ve bastante bien. Este de la foto es uno de esos baratísimos que se consiguen en cualquier parte pero podés conseguir uno donde sea y de mejor calidad para que te dure más.
For spring & summer bright nail polishes are always trendy, in my case I don't love very bright colors, so I like to use white nail polish, it's as flashy as the other colors but still neutral. For these days it looks beautiful with tanned skin besides this color is very very fashionable and I joined the trend because it looks pretty good. The one in this picture is a really cheap one, the kind of nail polish you can get anywhere but you can get a better quality nail polish to make it last longer
Hair Mousse
Y por último, les recomiendo usar un mousse para el pelo cuando no tienen mucho tiempo para arreglárselo. Yo me lavo el cabello lo aplico como tratando de hacer ondas esto le da volumen y un estilo relajado y bohemio, la verdad me encanta como se ve aparte me dura todo el día y no me tengo que preocupar por si esta enredado o no, siempre se ve bien, Con esto conseguís cabello con volumen y textura sin tener que usar un rizador aparte de que no durás 5 min. Este que uso es de Suave
And finally, I recommend using a hair mousse when you don't have plenty of time to do your hair. I wash my hair, then I apply it trying to make waves, this provides volume and a relaxed, bohemian kind of style, I really love how it looks it lasts on me all day and I don't have to worry about tangled hair, always looks good, with this you can get voluminous hair with texture without using a curling iron and it takes less than five minutes. This one is from Suave
Espero que les haya gustado el post de hoy y que les sea bastante útil, además espero que disfruten muchísimo estos días de sol y nunca esta demás aceptar la ayuda de esos productos que nos hacen ver un poquito mejor.
I hope you liked today's post and hope this was helpful. Also I hope you enjoy these sunny days and remember it never hurts to take help from those products that make us look a little bit better.
Clearly I was inspired by Kendall Jenner to make this video.
I'm sure I'm not the only one who thinks that her makeup is always perfect, I
wanted to recreate this look specifically because I love matte red lips,
besides the eye makeup is pretty easy and I always go for convenience. Not
exactly the same, as the title says is inspired, but I did my best to make it
as similar as possible.
I started with the eyes, I used a light shade on the eyelid
is called "Nude" from NYX,
then I apply bronzer as my transition color, and finally used a darker color in
the crease creating a V, for that I used "Dark Brown" from NYX.
is called "Nude" from NYX,
then I apply bronzer as my transition color, and finally used a darker color in
the crease creating a V, for that I used "Dark Brown" from NYX.
I'm not a fan of false eyelashes because to be honest I'm
not the best applying them and I feel that they take away my real lashes when I remove them, but I do not
deny that the eye will look much better if you choose to use falsies. I only
wore mascara "Colossal Volume Express" from MAYBELLINE, my favorite
of the moment.
not the best applying them and I feel that they take away my real lashes when I remove them, but I do not
deny that the eye will look much better if you choose to use falsies. I only
wore mascara "Colossal Volume Express" from MAYBELLINE, my favorite
of the moment.
Moving on to my face, after applying foundation and have
filled my eyebrows, I used concealer to brighten and cover my dark circles, I
blend with my finger, it's easier to me than using a brush or sponge, but you
can use your favorite tool. Can not forget to seal the entire face with powder.
filled my eyebrows, I used concealer to brighten and cover my dark circles, I
blend with my finger, it's easier to me than using a brush or sponge, but you
can use your favorite tool. Can not forget to seal the entire face with powder.
Then I applied blush and bronzer to contour. This step is
super important, the face changes dramatically and you can contour the nose if
you think it is necessary.
super important, the face changes dramatically and you can contour the nose if
you think it is necessary.
The makeup is not complete without using a highlighter on
the cheek bones and nose.
the cheek bones and nose.
Finally I used eyeliner and red lipstick, then I cleaned the
edges with a flat brush and concealer, obviously the red lipstick is the main
element but this eye makeup is fairly neutral to be used with any lip color.
edges with a flat brush and concealer, obviously the red lipstick is the main
element but this eye makeup is fairly neutral to be used with any lip color.
And that’s it! This is my version of Kendall’smakeup, the one that she
uses in that picture I've seen so many times on Tumblr and Pinterest.
uses in that picture I've seen so many times on Tumblr and Pinterest.
I hope you liked the video, and were helpful and don’t forget to subscribe to my channel!
___________________________________________________________
Claramente me inspiré en Kendall jenner para hacer el video del post de hoy. Estoy
segura que no soy la única que piensa
que su maquillaje es siempre perfecto, quise recrear este look en específico
porque me encantan los labios rojos mate, aparte de que el maquillaje en los
ojos es bastante fácil y yo siempre me voy por lo práctico. No es exactamente
igual, como dice el título es inspirado, pero hice lo mejor que pude para que
quedara lo más parecido posible.
Empiezo con los ojos, utilicé una sombra clara para el
párpado se llama “Nude” y es de NYX, luego puse bronceador como color de
transición, y por último aplico un color
más oscuro en la cuenca del ojo creando como una V, para eso usé “Dark Brown”
de NYX.
párpado se llama “Nude” y es de NYX, luego puse bronceador como color de
transición, y por último aplico un color
más oscuro en la cuenca del ojo creando como una V, para eso usé “Dark Brown”
de NYX.
No soy mu fanática de las pestañas postizas porque para ser
sincera no soy la mejor poniéndolas aparte de que siento que cuando me las
quito me arrancan todas las reales, aunque no niego que el ojo se ve mucho
mejor si deciden utilizarlas. Yo solamente usé mascara de pestañas “Colossal
Volume Express” de MAYBELLINE, mi favorita del momento.
sincera no soy la mejor poniéndolas aparte de que siento que cuando me las
quito me arrancan todas las reales, aunque no niego que el ojo se ve mucho
mejor si deciden utilizarlas. Yo solamente usé mascara de pestañas “Colossal
Volume Express” de MAYBELLINE, mi favorita del momento.
Pasando a la cara, después de haber aplicado base y haber
rellenado mis cejas, usé corrector para iluminar y tapar los círculos debajo de
los ojos, difuminé con el dedo porque me es más sencillo que con una brocha o
con una esponja, pero pueden usar con lo que se sientan más cómodas. No se
pueden olvidar de sellar con polvos toda la cara.
rellenado mis cejas, usé corrector para iluminar y tapar los círculos debajo de
los ojos, difuminé con el dedo porque me es más sencillo que con una brocha o
con una esponja, pero pueden usar con lo que se sientan más cómodas. No se
pueden olvidar de sellar con polvos toda la cara.
Luego apliqué rubor y bronceador para contornear. Este paso
es super importante, la cara cambia muchísimo y pueden contornear la nariz si
les parce necesario.
es super importante, la cara cambia muchísimo y pueden contornear la nariz si
les parce necesario.
El maquillaje no está completo si no uso un iluminador en
los pómulos y la nariz.
los pómulos y la nariz.
Por último utilizo un delineador y un labial rojo, luego
limpio las orillas con una brocha plana y con corrector, obviamente el labial
rojo es el elemento principal pero este maquillaje de ojos es bastante neutro
como para usarse con cualquier color.
limpio las orillas con una brocha plana y con corrector, obviamente el labial
rojo es el elemento principal pero este maquillaje de ojos es bastante neutro
como para usarse con cualquier color.
Y listo! Esta es mi versión del maquillaje que kendall usa
en esa foto que he visto tantas veces en Tumblr y en Pinterest.
en esa foto que he visto tantas veces en Tumblr y en Pinterest.
Espero que les haya gustado el video, que les sea útil y no
olviden suscribirse al canal!
"Never Enough" también tiene un canal de YouTube, los invito a suscribirse, comentar y darle "me gusta" al video.
Quise enseñarles mi rutina de maquillaje, esto es lo que uso la mayoría de los días, excepto esos en los que no voy a hacer absolutamente nada en especial y no quiero arreglarme tanto, en esos días simplemente elimino algunos pasos. A muchos les puede parecer demasiado maquillaje y para otros no tanto, sin embargo, con esto es con lo que me siento cómodo y realmente disfruto el proceso.
Antes de empezar aplico humectante, el que uso es de "Neutrogena" y se llama "Ultra-Light" contiene protector solar, porque creeme tenés que protegerte del sol aún los días en los que hay miles de nubes y no ves un solo rayo, después aplico un primer, o en español, una pre base. El que uso se llama "Instant Age Rewind" es de "Maybelline". Hace poco descubrí la gran diferencia que pueden hacer en tu maquillaje, al principio cuando lo empecé a usar no notaba gran cosa y no entendía que era exactamente lo que se suponía que debía hacer, lo seguí usando por varias semanas hasta que un día se me olvido ponérmelo, en ese momento noté la diferencia, cuando aplicaba mi base ya no era lo mismo y no se distribuía con la misma facilidad, además de que el maquillaje duró menos y después de varias horas la cara se notaba más grasosa.
Mi base favorita hasta el momento es "True Match" de "L'Oreal" en mi opinión es excelente, cubre las imperfecciones bastante bien y no se siente pesada, además la podés conseguir en prácticamente cualquier lugar y no te da el efecto de "cara de queque"
Después de la base me gusta iluminar el área debajo de los ojos, lo hago con un corrector dos o tres tonos más claros que mi tono de piel para lograr el efecto iluminador y tapar esas ojeras que nadie quiere. Quisiera poder decir que el que uso es el famoso "Nars Radiant Creamy Concealer" pero el corrector "Fit me" de maybelline es una buena alternativa por un precio muchísimo más bajo.
Es importante sellar el corrector y la base, para el corrector uso unos polvos más claros porque sino arruinaría todo lo que hice para iluminar.
Para mis cejas uso un lápiz, nosé cual es la marca pero funciona bastante bien, solo hago unos pequeños puntos por donde quiero rellenar y con una brocha angular les doy forma.
En mis mejillas utilizo el rubor no muy rosado, más bien me gustan los colores con un "undertone" café y utilizo polvos bronceadores para darle dimensión a la cara y que no se vea tan "flat". Además un paso super importante es el de aplicar iluminador, últimamente estoy obsesionada con el efecto que le da a los pómulos, me gusta decirle el efecto porcelana.
Pasando a los ojos, uso el mismo "bronzer" que usé anteriormente para oscurecer la cuenca del ojo, aplico sombra en la parte inferior, iluminador en las esquinas internas del ojo y por supuesto no me puede faltar el delineador, me encanta como alarga el ojo y cambia la forma completamente. Por último aplico mascara de pestañas, he probado alrededor de quince mascaras diferentes y aprendí que las de maybelline son buenísimas, más que muchas de marcas como mac por ejemplo.
Y el último paso en mi rutina siempre son los labios, los delineo para darles más forma con un tono más oscuro que el lipstick que voy a usar y así lograr el efecto de labios más gruesos, me encantan los labios en tonos nude y mate, los "Soft Matte Lip Cream" de "Nyx" son excelentes para ese efecto y lo combino con un lisptick de mc para tener el color que quiero.
Espero que estos pasos, consejos o como quieran llamarlos les sean de utilidad y los puedan puedan en práctica.
Que tengan un lindo día!
Priscilla Correa
--------------------------------------------------------------------------
--------------------------------------------------------------------------
"Never Enough" also has a YouTube channel, I
invite you to subscribe, comment and
"like" this video.
I wanted to show you my everyday makeup, this is what I do most
of the
days, except those which I know I
won’t be doing
absolutely anything. On those days I just skip some steps. For some of you it seems too much makeup and for some of you don’t , however, this is what I feel
comfortable with and I really enjoy the process.
Before I started I apply moisturizer, I like to use
"Neutrogena" and is called "Ultra-Light" contains
sunscreen, because believe me you have to protect yourself from the sun even on
days where there are thousands of clouds and you can’t see the sunlight, then I
apply a primer. The one that I use is called "Instant Age Rewind" from
"Maybelline". I recently discovered the big difference they can make
on your makeup, at the beginning when I started using it I didn’t
notice anything and did not understand what was exactly what it was
supposed to do, I kept using the primer for a couple of weeks until one day I forgot to apply it, then I noticed the
difference, when I was blending my foundation it was no longer the same, the
aplication was harder , besides the makeup lasted less and after a few hours I
started to notice that my face was getting oily.
My favorite foundation so far is "True Match"
from "L'Oreal" in my opinion is an excellent option, it covers your imperfections
quite well and doesn’t feel heavy, also
you can get it anywhere and doesn’t give you the effect of “Cake face”
After foundation I like to brighten up the under eye area, I
do it with a concealer two or three shades lighter than my skin tone to achieve
the illuminating effect and it covers those dark circles that nobody wants. I
wish I could say that the one that I use is the famous "Nars Radiant Creamy
Concealer" but the concealer I use is "Fit Me" maybelline is a
good alternative for a much lower price.
It is important to set the concealer and your foundation.
For concealer I use powder, again, two or three shades lighter tan my skin
tone, because if I don’t, the previous step would be ruined.
On my eyebrows, I use a pencil, I don’t know the name of the brand but it works pretty
well, I just do a few small dots where I want to fill and with an angled brush
I shaped them.
On my cheekbones , I prefer blushes with a peachy undertone and I use bronzing powder to add dimension to
my face so I don’t look flat. Also a super important step is to apply
highlighter, lately I've been obsessed with the effect that it gives to your
cheeks, I like to call it the porcelain effect.
Moving on to the eyes, I use the same bronzer previously used to darken my crease, I apply
shadow on the bottom lash line, highlighter in the inner corners of the eye and
of course I can not miss the eyeliner, I love how it elongates the eye and how
it completely changes the way it looks. Finally I apply mascara, I tried about
fifteen different mascaras and learned that maybelline has great ones, even
better than some high end brands.
And the last step in my routine are the lips, I use a lip liner darker than the lipstick I will be using to achieve the ilusion of fuller lips, I love
the nude tones and matte shades, "Soft Matte Lip Cream" from "NYX"
are great for this purpose and I combine it with a MAC lisptick to get the
color I want.
I hope these steps, tips or whatever you want to call them,
were helpful so you can get some inspiration from my makeup routine. Some of
them are pretty obvious, but hopefully you didn’t know a couple.
Have a beautiful day!
Priscilla Correa
No comments:
Post a Comment